
Developing in a stable, reliable environment is key to any project. This post serves as an abridged quickstart guide for new Python projects and the common tooling which you may find yourself using.
Base Dev Stack Summary #
| Tool/Package | Purpose |
|---|---|
| uv | Dependency Management |
| ruff | CLI Linting and Code Formatting |
| pytest | Testing |
| pre-commit (optional) | For the configuration of pre-commit linting/formatting checks |
| Extension | Purpose |
|---|---|
| Python | For Python language support in VSCode, e.g IntelliSense |
| Python Debugger | For debugging your python project code |
| ruff | For inline Linting and Code Formatting in the VSCode editor |
| autoDocstring | To easily write docstrings |
| Error Lens | Improved highlighting of errors, warnings |
| Devcontainers (optional) | If using devcontainers, see below |
| Even Better TOML (optional) | Adds nice usability features to TOML files, e.g pyproject.toml |
| Excalidraw (optional) | For drawing infrastructure diagrams,etc |
Extensions #
From here on presumes VSCode and Python have already been installed
I will start with the setup of extensions as this covers the discussion on global/workspace/container settings. With VSCode installed, you can configure extensions at three scopes: Global, Workspace, and Devcontainer. Regardless of the scope you configure the extensions, they are all identified by some Extension ID e.g ‘ms-python.python’ optionally, with a specific version number appended to it like so - ‘ms-python.python@3.20.3’. Unless you are using a devcontainer (see below) the configuration settings are stored in your local VS Code settings .vscode/extensions.
Global
Unless you are using a devcontainer and have specified extensions in a devcontainer.json file, all extensions you install VSCode are installed globally by default. These globally installed extensions are available across all workspaces unless explicitly disabled for a specific workspace. Likening it to not using a venv, it can lead to polluting your environment over time.
Workspace
If you specify an extension in your workspace ’.vscode/extensions.json’ that extension will not be the only one loaded, it serves only as a recommendation list for extensions that the workspace suggests to the user. All globally installed extensions will be loaded unless explicitly disabled via right-click extension -> Disable(Workspace) to completely isolate the installation of extensions, use devcontainers.
’.vscode/extensions.json'
{
  "recommendations":[
    "some-extension.python",
    ...
  ]
}
Devcontainer
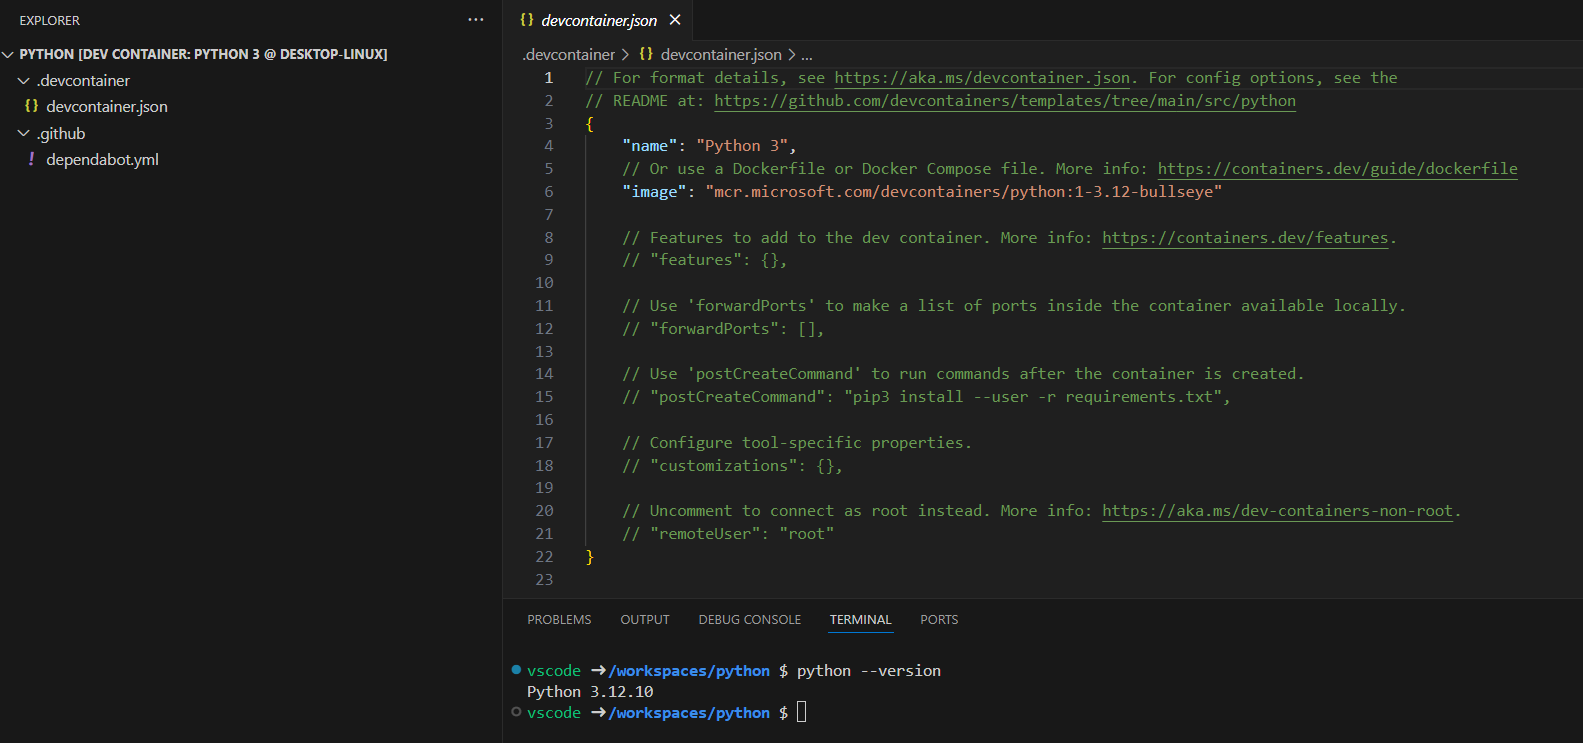
Devcontainers are used to define a development container, a docker based environment which allows developers to standardise their development setup. Using devcontainers requires docker to be installed locally. If using devcontainers, configuration on which extensions will be installed automatically once the container is created is stored in .devcontainer/devcontainer.json. By using devcontainers, all the configuration is encapsulated in the container which ensures consistency across environments, and rids reliance on local/global settings.
To set up a devcontainer:
- First, check you have docker installed and the daemon is running
> docker --version
Docker version 28.0.4, build b8034c0
- Install the devcontainer extension by opening the Extensions panel with Ctrl+Shift+X, searching for ‘Dev Containers’, and clicking Install
- Open the command pallete with Ctrl+Shift+P and select ‘Dev Containers: New Dev Container’ (This may take some time to run)
- A .devcontainer folder and devcontainer.json file will be created if you select a predefined container. If they do not appear they can be created from the command palette by searching for Dev Containers: Add Dev Container Configuration Files. Note the ‘image: … ‘ property in the json file, if you wish use your own dockerfile or docker-compose.yml instead, you may do so here by referencing the dockerfile: … or dockerComposeFile: … property instead. A list of available pre-built container images which you can use is available here
For more details on devcontainers, you can find them here
Recommended Extensions #
For Python projects, I recommend:
| Extension | Purpose |
|---|---|
| Python | For Python language support in VSCode, e.g IntelliSense |
| Python Debugger | For debugging your python project code |
| ruff | For inline Linting and Code Formatting in the VSCode editor |
| autoDocstring | To easily write docstrings |
| Error Lens | Improved highlighting of errors, warnings |
| Devcontainers (optional) | If using devcontainers, see below |
| Even Better TOML (optional) | Adds nice usability features to TOML files, e.g pyproject.toml |
| Excalidraw (optional) | For drawing infrastructure diagrams,etc |
Installing Extensions #
Installing extensions in your workspace/globally
To install extensions in your workspace/globally:
- Open the Extensions panel with Ctrl+Shift+X
- Search for the extension name in the navigation bar
- Select ‘Install’
Installing extensions in your devcontainer
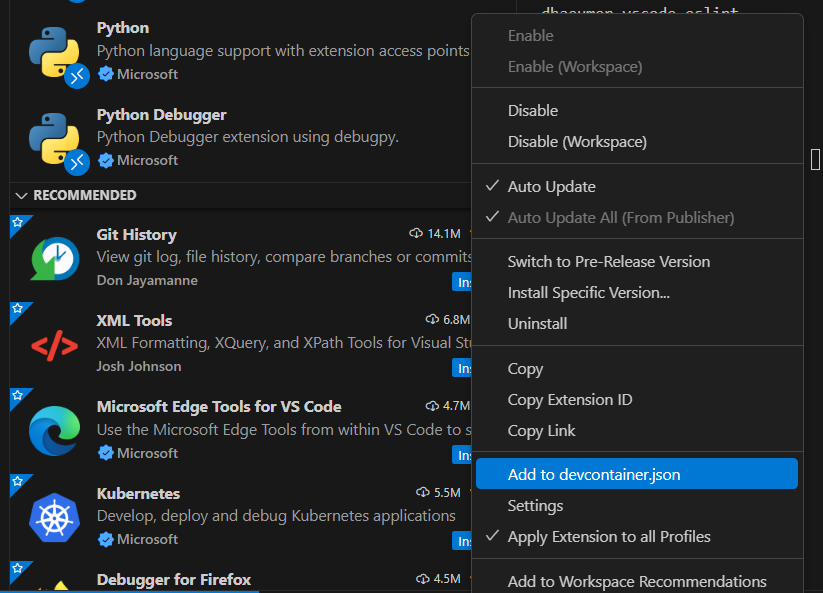
To install extensions to your devcontainer, either add it through the VSCode UI:
- Open the Extensions panel with Ctrl+Shift+X
- Click the cog wheel next to the extension
- Select Add to devcontainer.json
or alternatively, add it directly to the devcontainer.json file yourself:
- Open the configuration file, .devcontainer/devcontainer.json
- Add the Extension ID to the customizations section of the file (more details on config here):
{
    "name": "my_container",
    "dockerComposeFile": ["../docker-compose.yml"],
    "service": "my_service",
    "customizations": {
        "vscode": {
            "extensions": [
                "ms-python.python",
                "my-extension.python"
            ],
            "settings": {
                "python.defaultInterpreterPath": "/usr/bin/python3"
            }
        }
    },
    "remoteUser": "root",
    "forwardPorts": [1234]
}
class="flex px-4 py-3 rounded-md bg-primary-100 dark:bg-primary-900"
<span
  class="text-primary-400 ltr:pr-3 rtl:pl-3 flex items-center"
>
<span
  class="dark:text-neutral-300"
>If you make a change to your dev container after having built and connected to it, be sure to run <em>Dev Containers: Rebuild Container</em> from the Command Palette (cmd/ctrl+shift+p or F1) to pick up any changes you make.</span>
Using Extensions #
To make use of extensions and see what commands it makes available to you:
- Open the Command Palette with Ctrl+Shift+P
- Type the beginning of the extension name, e.g ‘Error Lens’ and a list of commands will show in the dropdown which you can select from
Project Creation and Package Installation #
Not every project needs to developed inside a devcontainer, nor does every project need to be packaged or published to Pypi - however, every project should be utilising some form of virtual environment. I’ve very broadly split the setup into three categories aligned with these goals, each building upon one another. Every one starts with uv at its core as a dependency manager because its fast, intuitive (replacing pip commands almost like-for-like) and makes use of pyproject.toml files for configuration following PEP 621, replacing usage of ‘requirements.txt’ which lacks any metadata for compapatability or integration with modern workflows. Noted below are some use cases for using each.
uv
- Fast development to stand up a POC with minimal overhead
- You do not want to package the project and make use of things like entrypoints
- You do not intend to publish the project
- You only intend to run it from the project workspace (via your venv for dependencies)
uv + Hatchling
- You want the project to be installable, e.g via a .whl
- You want it to be importable for other projects
- You want to make use of entrypoints e.g
pyproject.toml
...
[project.scripts]
my-function = "my_package:my_function"

[tool.hatch.build]
sources = ["src"]
bash
> uv pip install -e .
> my-function
uv + Hatchling + DevContainers
- You need to standardise development environments across Linux/Windows/some other image
- You want to isolate the projects development environment venv and extension confugration
- You need to run other containerised apps alongside your project
- You need a fast, bundled way to deliver a ready to go environment for quick start-up
Creating Your Project #
Now the extensions are installed and you have VSCode ready, start to build the project by firtst opening the terminal with Ctrl + Shift + ‘ then:
If you intend it to be an ‘Application Project’ ie, uv only for CLIs , scripts:
Application Project Example
> uv init example-app
This will create a base project layout like so:
> tree example-app
example-app
|- .python-version
|- README.md
|- main.py
L pyproject.toml
The pyproject.toml includes basic metadata. It does not include a build system, it is not a package and will not be installed into the environment. The python files can be executed with ‘uv run’ - you don’t need to activate the venv manually, uv run activates the environment implictly like ‘poetry run’ or ‘hatch run’.
> uv run main.py
Hello world !
If you intend it to be an ‘Packaged Application’ ie, uv with a hatchling build system for CLIs which might need to be published to PyPi or make use of entrypoints, or a ‘Library Application’ ie, uv with hatchling build system to be consumed in another project:
uv provides a command to create a project of type Package and of type Library. There is quite frankly little difference as you can import a package as you would a library, or simply add a CLI entry point to pyproject.toml in a library project so users can run it directly on the command line as you would a package - but I digress.
Packaged Application Example
Note the src based workflow. The dunder init init.py is what makes it a package
> uv init --package example-pkg
This will create a base project layout like so:
> tree example-pkg
example-pkg
|- .python-version
|- README.md
|- pyproject.toml
L src
  L example_pkg
    L __init__.py
[project]
name = "example-pkg"
version = "0.1.0"
description = "Add your description here"
readme = "README.md"
requires-python = ">=3.11"
dependencies = []

[project.scripts]
example-pkg = "example_pkg:main"

[build-system]
requires = ["hatchling"]
build-backend = "hatchling.build"
> uv run example-pkg
Hello from example-pkg!
Library Application Example
Note the src based workflow and addition of py.typed file. Like the package example, the dunder init init.py is what makes it importable as a package / defines it as a package (libaries implicitly start as packages)
> uv init --package example-lib
This will create a base project layout like so:
> tree example-lib
example-lib
|- .python-version
|- README.md
|- pyproject.toml
L src
  L example_lib
    |- py.typed
    L __init__.py
[project]
name = "example-lib"
version = "0.1.0"
description = "Add your description here"
readme = "README.md"
requires-python = ">=3.11"
dependencies = []

[build-system]
requires = ["hatchling"]
build-backend = "hatchling.build"
> uv run python -c "import example_lib; print(example_lib.hello())"
Hello from example-lib!
Because of the aformentioned similarity above, I will suggest the following to get your project started:
> uv init --package my-project
This will create a base project layout like so:
> tree my-project
my-project
|- .python-version
|- README.md
|- pyproject.toml
L src
  L example_lib
    |- py.typed
    L __init__.py
and the pyproject.toml file:
[project]
name = "my-project"
version = "0.1.0"
description = "Add your description here"
readme = "README.md"
requires-python = ">=3.11"
dependencies = []

[build-system]
requires = ["hatchling"]
build-backend = "hatchling.build"
From this scaffold, add cli.py to the my-project/ directory which can serve as a place for the interface logic of the package,and something like core.py to the my-project/ directory to hold the proper business logic, following the principle of Separation of concerns the cli.py can import and run methods from core.py. Then, add a [projects.scripts] section to the pyproject.toml file to make the cli available. I have also added a tests/ folder to further demonstrate what a more complete layout would look like note there is no dunder init in the tests folder, as it is not an importable package.
> tree my-project
my-project
|- .python-version
|- README.md
|- pyproject.toml
L src
  L my-project
    |- py.typed
    |- cli.py
    |- core.py
    L __init__.py
L test
  L tests_core.py
[project]
name = "my-project"
version = "0.1.0"
description = "Add your description here"
readme = "README.md"
requires-python = ">=3.11"
dependencies = []

[project.scripts]
my-cli = "my-project.cli:main"

[build-system]
requires = ["hatchling"]
build-backend = "hatchling.build"
To test your package run the commands below, this will install your package in editable mode (-e), installing all the required declared dependencies etc.
NB: Running ‘uv run my-cli’ will not install the package but it will look for pyproject.toml, install all declared dependencies, then run it in the environment - so its fine for testing so long as youre in the root directory. uv run can be used to run arbitrary scripts or commands in your project environment.
> uv pip install -e .
> my-cli
More information on all of the above can be found here
Package Installation #
Dependencies can now be added. Its easiest to add dependencies from the command line, but you can also directly edit the pyproject.toml file dependencies = [] section if you want.
To add a dependency:
uv add ruff
To remove a dependency:
uv remove ruff
I recommend the following to start:
| Tool/Package | Purpose |
|---|---|
| uv | Dependency Management |
| ruff | CLI Linting and Code Formatting |
| pytest | Testing |
| pre-commit (optional) | For the configuration of pre-commit linting/formatting checks |
You can also define dependency constraints on versions, platform specific dependencies, from specific sources and more - details here
https://pydevtools.com/handbook/tutorial/setting-up-testing-with-pytest-and-uv/
Expand for uv command cheatsheet
## install uv on OS
curl -LsSf https://astral.sh/uv/install.sh | sh

## create new basic project
uv init myproj

## create new packaged application project
uv init --package example-pkg

## install packages
uv add django requests "pandas>=2.3"

## remove package
uv remove django

## see pkg dependency tree
uv tree

## run a python script directly w/o starting venv
uv run main.py

## install specific version of python
uv python list
uv python install 3.12

## start a new project and pin it to Python 3.12
uv init myproject
uv python pin 3.12
uv add django
uv run main.py (will automatically install py3.12 and django into venv)

## run a cli tool like Ruff
uv run tool ruff (or uvx ruff)

## update uv version to latest
uv self update

## Update dependencies in lock file
uv lock —upgrade
Settings #
This is a return back to the discussion on workspace/global settings and so on. The reason I went through installation of packages first and setup of code project files to better illustrate how they impact your development.
Open your user (global settings) or workspace settings with ‘Ctrl+Shift+P’ ‘Preferences: Open Workspace Settings’’. It may be empty now but here, you can specify a number of settings (a full list is available here), such as the default interpreter for python. I mention this specifically, as you may run into an unexpected error when running debug configurations or tests in VSCode, missing dependencies for example. This is often due to the default interpreter path being set to the global install of python in /usr/bin and not the python interpreter in your venv, see in the below screenshot how this can be configured. If you just want to set it quickly this can be done by opening the command palette (’Ctrl+Shift+P’) and clicking ‘Python: Select Interpreter’ and entering the path to the venv python interpreter. The same thing goes for pytest settings, if you work in a standardised way, e.g src-based development, it can be useful to have these settings preconfigured to avoid any annoying issues in the future.

After all of the above is done you should have a generic structure to your project, extensions loaded, and some settings configured. Test frameworks and the like are delving into actually how to actually develop properly, not how to scaffold a new project so its been omitted.